


One Scotsman restoration and one conversion.
I recently bought two Wrack of a "Flying Scotsman" at AC models.
Perhaps I was a bit naive as I'm totaly inexperienced into this specific Hornby live steam technolgie.
Anyway, one has to try, and it will not always be the easy way, but you learns in the process.
The first time I first came realy eye to eye with this technology was about a thick week ago.
But going to the clubs anual sommer meeting, was realy a good learning expetriance.
Thanks to the wonderfull thechnical inization course, that Maurice and Richard gave me on the Mallard, I got a good inside idea.
But that does not makes me an expert, far from, and I had to call in the help of Maurice again, I'll come to back to that later.
But this is a bit an idea what the AC model wracks look like, of course with a lot of parts missing or broken.
One model a little bit worse than the other.

Here I had some great help from the clubs shop keeper Nick, who helped me finding 95% of the missing parts that where in the clubs shop store availeble.
And by purchasing from the clubsshop you also help the organization as I understand it.
So it's a win win deal.
Anyway comming back from the UK I had a good look at my two wracks and decided to start with the one that was in best shape.
For this one I decided to keep it, in it's original Hornby version.
Replacing all the O-rings and Gaskets, and by adding the missing parts I gave it a try.
7min pre heating, the boiler heating up the super heater warming up, the saftey valve puffing steam the red light turning into green, but form there the proces stoped no movement although I felt tention on the pistons.
Afraid I might do more wrong than right, I contacted Maurice again, asking for his help.
Because a long distace restoration is nearly impossible, it was best to ship it to Maurice, so off it went today…
There can't be much wrong with it and I hope Maurice can turn his magic on it, fingers crosed.
I have an idea what my be wrong, but going to wait what Maurice has to say about it.
But before it went off to Maurice, I put the aesthetics in ship shape.
This is something that was right up my alley.
There was one essential part that wasn't available at the club shop, although Nick sad that they are working at it, was the water plug.
Having an original from the Mallard, that also fits the A3, it was no problem to make a brass replica one on my lathe.


Next up was an aesthetic part that was missing, and also rare to non availeble, it's chimney.
So again, some lathe work, and she had a new schimney.


After painting it black with heat resistant black paint se was as good as new.
So fingers crosed that Maurice gets her running again.
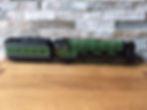
The second one is in worse shape, and will have an aesthetic transformation into a late A3 BR version of "Night Hawk".
I found photos of the "Night Hawk" in BR livery, that for copy right resons I can't show you direct, but look at link:
http://rcts.zenfolio.com/steam-lner/a-4-6-2/a3/hA890307C#ha890307c
For the color reference I used an electric BR version of the Scotsman that I've got in my collection.
With a RAL color match determined, that RAL 6012 blackgreen, was the matching color.

Today also the name plates arrived, and to my supprise, it was not only the name plates and boiler number but also the number decals.
So, I'm very pleased with that.
You can find them on ebay.

I'm now going to start with making a double chimney.
But that for next time…
Cheers,
Danny
Danny just re-reading this as I am so impressed and have a question. What did you use to make the rivets?